TL;DR
Acoustic dampening isn’t just about foam — it’s about where you put it and how you block or absorb sound. Moving your rig into a closet with proper ventilation can dramatically cut noise, but sealing gaps and controlling low frequencies matter most.
Ever wondered why some home studios sound professional, while others are full of echo or bleed noise? The secret isn’t just in fancy foam panels or expensive gear. It’s where you place your setup and how you treat the space around it. Acoustic dampening, placement, and the ‘rig in the closet’ setup can make a big difference.
If you’re serious about quiet, clean recordings or reducing noise in your work environment, understanding the power of acoustic dampening, placement, and the humble ‘rig in the closet’ can transform your space. You’ll learn how to balance sound absorption with soundproofing, optimize placement, and avoid common pitfalls that turn a simple closet into a noisy nightmare.
Acoustic dampening
& the rig in the closet.
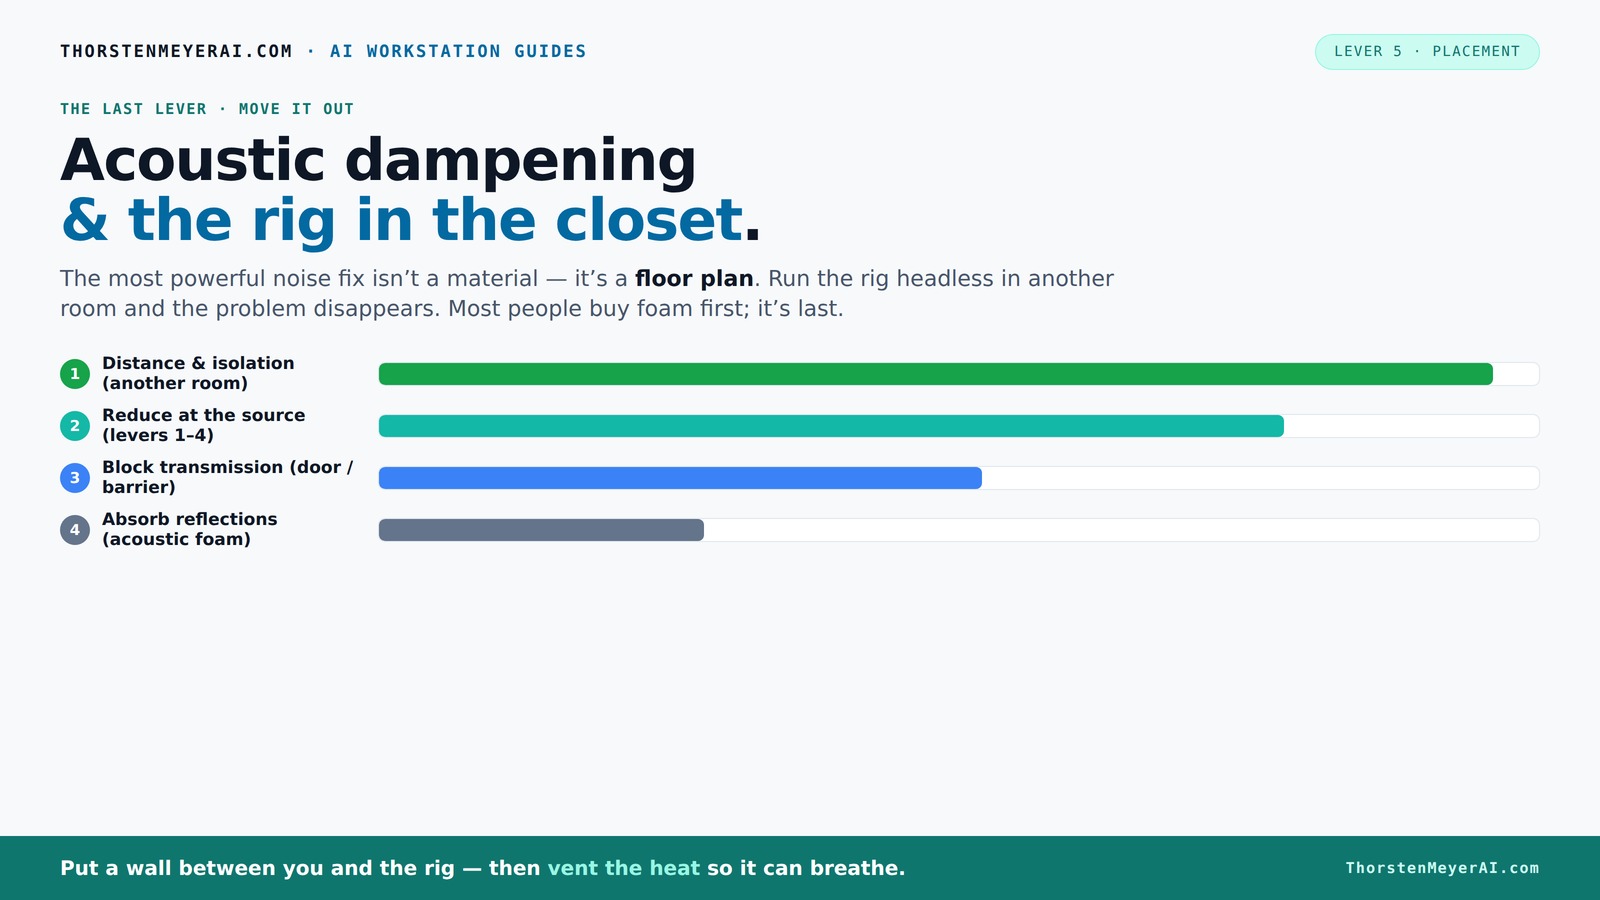
The most powerful noise fix isn’t a material — it’s a floor plan. A rig you can’t hear because it’s in another room beats any amount of foam. Tap the approaches in Part 1 to see what actually works.
(another room)
(levers 1–4)
(door / barrier)
(acoustic foam)
Contain the noise, not the heat
Key Takeaways
- Moving your rig into another room or closet is the most effective way to reduce noise without complex treatments.
- Proper ventilation is essential to prevent heat buildup in closet setups; active airflow solutions are a must.
- Acoustic treatment should target reflection points—mainly side walls, ceiling, and behind the mic—to maximize sound quality.
- Sealing gaps and adding mass are keys to significantly reducing sound leaks and improving soundproofing.
- Controlling low frequencies in small spaces requires bass traps and thick, dense panels, not just foam.

Focusound 52 Pack Acoustic Foam Panels 1" x 12" x 12" Sound Proof Foam Panles Soundproofing Noise Cancelling Wedge Panels for Home Office Recoding Studio with 300PCS Double-Side Adhesive
Soundproofing - Acoustic foam panels triangular grooves structure for better noise absorption, helps to reduce and absorb unwanted...
As an affiliate, we earn on qualifying purchases.
As an affiliate, we earn on qualifying purchases.
Why Moving Your Rig Is the Most Powerful Noise Fix
Moving your AI workstation or gaming rig into another room is the simplest way to cut noise. Think of it like turning off a noisy machine—distance diminishes sound more than any foam panel ever could. For example, placing a 600W GPU in a closet with a door can decrease its noise heard in your workspace by over 70%, simply because sound has to travel further and through less direct paths.
This approach is perfect for those who work remotely or don’t need their rig physically nearby. All you need is a reliable network connection and proper ventilation. Your laptop or tablet becomes your interface, while the loud hardware roars in peace behind the wall.
In essence, the best way to dampen noise is to physically isolate the machine from your ears. It’s the first and most effective step in a hierarchy of sound management that starts with distance.

Sound Addicted - Studio Monitor Isolation Pads suitable for 6.5, 7 and 8 Inches Large Speakers | Reduce Vibrations and Fits most Stands - Pair | SMPad 8
SMPad 8 is made out of the highest quality acoustical foam (50kg/m^3 density).
As an affiliate, we earn on qualifying purchases.
As an affiliate, we earn on qualifying purchases.
The 'Rig in the Closet' Setup — How to Do It Right and What to Watch Out For
Placing a noisy, high-power rig inside a closet can be a game-changer for noise reduction. But the key is ventilation. Without airflow, heat builds up fast, and your machine risks overheating or throttling—exactly what you want to avoid.
For example, a popular DIY hack involves installing a small exhaust fan or a vented panel, allowing hot air to escape while keeping sound waves contained. Some creators even install custom soundproof cabinets with ducted airflow, reducing noise by up to 36 dB while maintaining safe temperatures.
Remember: a sealed space traps heat. If your closet is completely airtight, include active ventilation—either a quiet fan or a heat-extracting duct. It’s about balancing soundproofing with cooling, not sealing off all airflow like a bunker.
Check out this guide on [how to reduce heat and noise in a high-power AI workstation](https://thorstenmeyerai.com/reduce-heat-noise-ai-workstation/) for detailed plans and product ideas.

Audimute Soundproofing Acoustic Door Seal Kit - Door Sweep and Seal - (Standard Size)
Includes a Door Seal (3/16" x 1/2" x 25') and a Door Sweep (1/2" x 1.5" x 4').
As an affiliate, we earn on qualifying purchases.
As an affiliate, we earn on qualifying purchases.
Acoustic Treatment vs. Soundproofing: What's the Difference and Why It Matters
Acoustic dampening and soundproofing serve different purposes, though they often get mixed up. Acoustic treatment is about controlling how sound behaves inside your space—reducing echoes and reflections. Soundproofing, on the other hand, blocks sound from entering or leaving.
For example, placing foam panels on your closet walls will tame echo and deaden reflections, making recordings clearer. But those panels won’t stop sound from leaking outside if the door isn’t sealed or the gaps aren’t closed.
Understanding this distinction is crucial because many assume that adding foam will make a space soundproof, which is not the case. Learn more about effective soundproofing techniques. Effective soundproofing requires sealing gaps, adding mass, and sometimes decoupling structures to prevent sound vibrations from passing through walls and doors. Conversely, acoustic treatment improves the clarity and quality of sound within your space, which is essential for recording and mixing. Combining both strategies—soundproofing to contain sound and acoustic treatment to improve internal acoustics—creates a more professional and controlled environment. This layered approach ensures you’re not just reducing noise but also enhancing sound quality. For more tips, see our guide on acoustic dampening and setup.
Focusound 52 Pack Acoustic Foam Panels 1" x 12" x 12" Sound Proof Foam Panles Soundproofing Noise Cancelling Wedge Panels for Home Office Recoding Studio with 300PCS Double-Side Adhesive
Soundproofing - Acoustic foam panels triangular grooves structure for better noise absorption, helps to reduce and absorb unwanted...
As an affiliate, we earn on qualifying purchases.
As an affiliate, we earn on qualifying purchases.
Where to Put Acoustic Panels for Maximum Effect
Knowing where to place acoustic panels makes all the difference. Check out our article on optimal acoustic panel placement for more details. The first reflection points—on the side walls where sound bounces from your speakers or microphone—are prime spots. For a closet studio, focus on the wall behind your mic and the ceiling above your head.
Imagine speaking into a microphone — your voice bounces off the walls and ceiling. Mounting panels at these points minimizes echo and resonance. A simple trick is to have someone hold a mirror at ear level, then mark where the panels should go at those reflection spots.
For example, installing thick foam or bass traps in corners can tame low-frequency buildup, which is especially tricky in small rooms. You can also add soft furnishings like rugs or blankets to further soften reflections without overdeading the space.
Deeply understanding reflection points helps you target your treatment effectively. Proper placement reduces the chances of comb-filtering and muddiness, ensuring your recordings sound clear and professional. It’s not just about sticking panels randomly; it’s about strategic placement based on how sound interacts with your space. This reduces the need for excessive treatment and maximizes your investment in acoustic panels.
Sealing Gaps and Adding Mass for Real Soundproofing
Gaps around the door, outlets, or vents are sneaky sound leaks. Sealing these is often the cheapest, easiest way to improve soundproofing in a closet. Use weatherstripping on the door frame and acoustic sealant on cracks.
Adding mass, like an extra drywall layer or mass-loaded vinyl, makes it physically harder for sound to pass through walls and doors. For example, doubling drywall with damping compound can cut noise transmission by over 80%.
But beyond just adding mass, understanding the tradeoffs is key. Heavier walls and sealed gaps can improve soundproofing but also increase the difficulty of access and ventilation. Over-sealing can trap heat and moisture, creating other issues. Therefore, it's essential to balance sealing and mass addition with adequate ventilation solutions. Reinforcing the door with a solid core or heavy curtain can help, but keep in mind that perfect soundproofing in a small closet is often impractical—aim for a significant reduction rather than total isolation. This layered approach, combining sealing, mass, and ventilation, offers the best compromise between soundproofing and practicality.
Controlling Low Frequencies in Tight Spaces
Low-frequency sounds are the hardest to tame in tiny rooms. Standing waves and bass buildup often cause boomy, muddy audio. Bass traps in the corners and thicker panels can help reduce this problem.
For example, placing a bass trap in each corner of your closet can cut low-end resonance by up to 50%, making vocals and instruments sound clearer. However, the effectiveness depends on the room’s size and shape. In very small spaces, bass trapping becomes more critical but also more challenging because of limited space for treatment. Using dense foam combined with specialized bass traps designed for small rooms offers a practical solution. Additionally, employing digital room correction tools or EQ can help manage residual low-frequency issues. Using an AIO cooler that exports heat outside your closet can also help prevent heat-induced low-frequency noise caused by overheating fans or throttling, as explained in [this guide](https://thorstenmeyerai.com/liquid-vs-air-cooling-inference-rig/). Addressing low frequencies requires understanding the room’s acoustics and applying targeted treatments to prevent muddiness and ensure clarity across all audio ranges.
DIY vs. Professional Soundproofing — What’s Worth It?
DIY solutions like moving blankets, temporary panels, and door seals are cost-effective and quick. They work well for casual recording or reducing ambient noise. But for serious, consistent quality, professional solutions like custom soundproof booths or engineered panels are worth the investment.
For example, a DIY setup with thick blankets can reduce noise by around 20–30 dB, enough for casual voiceovers. But a purpose-built soundproof booth can cut sound by 36 dB or more, making it suitable for professional voice work. The tradeoff lies in durability, consistency, and the level of noise reduction needed. While DIY options are accessible and flexible, they often lack the precision and effectiveness of engineered systems, especially in challenging environments. When your work demands high fidelity and minimal external noise, investing in professional solutions becomes justified. Conversely, for hobbyist use or low-stakes projects, DIY tricks provide a reasonable balance between cost and performance.
Frequently Asked Questions
Can a closet really be used as a vocal booth?
Yes. With proper treatment—like reflection points, sealing gaps, and bass traps—a closet can produce clear, professional-sounding vocals. However, size and materials matter, and it won’t fully block outside noise without additional measures.Is foam enough for soundproofing?
Not usually. Foam helps reduce echo and reflections inside the space but doesn’t block sound from leaking out or in. Combining foam with sealing gaps and adding mass makes a real difference.Where should I put acoustic panels in a small closet?
Start with the first reflection points on the side walls, behind your microphone, and the ceiling above. These spots are where sound bounces and creates echo, so treating them reduces reflections and improves clarity.Do I need bass traps in a tiny room?
If you notice boomy low-end or uneven bass response, corner bass traps help. Even small ones can reduce low-frequency buildup and make your recordings sound cleaner.How much coverage do I need?
Partial coverage—around 20–40% of the surface area—is usually enough to tame reflections without deadening the room. Focus on reflection points first for the best results.Conclusion
Turning a closet into a quiet, effective workspace or vocal booth is a smart move—if you balance soundproofing with ventilation and placement. Remember, the goal isn’t just to deaden sound but to control how it behaves and leaks.
Start with the biggest wins: move your rig away, seal gaps, and treat reflection points. Then, if needed, invest in proper ventilation and bass trapping. With a little effort, your closet can become a surprisingly professional-sounding space—and a quieter corner for your work.